Showing posts with label nail art. Show all posts

Thursday, September 5, 2013

Guest Post Series, with The Polish Playground - Blue and Coral Chevron Nail Art Tutorial

Today, I welcome Lisa, from The Polish Playground. Lisa is a fairly new blogger, and she always has a great mix of nice clean, colour accurate swatches, and nail art.
I love the chevrons she did here. She very creatively made her own nail art stickers!! Read on to find out how.
Thank you Lisa for sharing with us today!


Hello everyone! I'm Lisa from The Polish Playground and its such an honor to be guest posting for Pam. This is actually only my second time doing a guest post so I wanted to try out a design I've never attempted on my blog. I recently bought a set of craft scissors from Micheals so I thought why not try out some chevron nails. I've always wanted to do one but for some reason never got the chance to. Let's see how it turned out.
girly bits guest post

girly bits guest post

girly bits guest post

girly bits guest post

I started with American Apparel American Denim on my pinky and ring finger. For the rest of my nails, I have on American Apparel Neon Coral. For my pinky and pointer finger, I did a simple gradient using Sally Hansen Bling-tastic. Prior to painting my nails, I painted a coat of American Apparel American Denim on parchment paper and allowed it to dry over night. With my zig zag scissors from Michaels, I cut some chevron stripes out of it. Then I peeled the polish off the parchment paper to reveal homemade nail decals. While the base color on my ring and middle finger was still tacky, I applied the chevron stripes on, making sure to press it down. Lastly, I applied Seche Vite Dry Fast Top Coat.

guest post for girly bits

girly bits guest post

girly bits guest post

I love how these turned out! I had a bit of trouble with the chevron stripes curling when I applied top coat so I'll have to practice more with it or try using scotch tape instead. Let me know what you think about this manicure below. If you want to see more from me, check out my blog, The Polish Playground. Thank you again to Pam for allowing me to guest post over at her blog. Have a great day everyone! Best Blogger Tips
  • Share On Facebook
  • Digg This Post
  • Stumble This Post
  • Tweet This Post
  • Save Tis Post To Delicious
  • Float This Post
  • Share On Reddit
  • Bookmark On Technorati
Blog Gadgets

Monday, August 26, 2013

Guest Post Series, with Chameleon Stampede

Here are are at a Monday... again. For me, this Monday has always marked the beginning of the end of summer because here in Canada the kids go back to school the day after Labour day. It's always a fun week, because we head to our cottage on Pelee Island for a week of relaxation with the family, but it's also a sad week because we know the relaxed vibe of summer is coming to an end.

In my absence this week, you will no doubt enjoy these colourful creations by Mandy, of Chameleon Stampede. Mandy always has a variety of different looks, to suit just about anyone's tastes. From indies, to  mainstream, from stamping to nail art, she will show you something fun. She also has tutorials, comparisons, and other random beauty related posts.

You can also check Chameleon Stampede out on any of her social media sites:

 Twitter: https://twitter.com/MandyChameleon

Facebook:  http://www.facebook.com/MandyChameleon

Pinterest: http://pinterest.com/chameleonstampe/

Google+: https://plus.google.com/u/0/104751266514379854989/posts

Instagram: http://instagram.com/chameleonstampede

Thank you Mandy, for sharing your creations with us!

♥Pam♥


Hello everyone!  <waves>
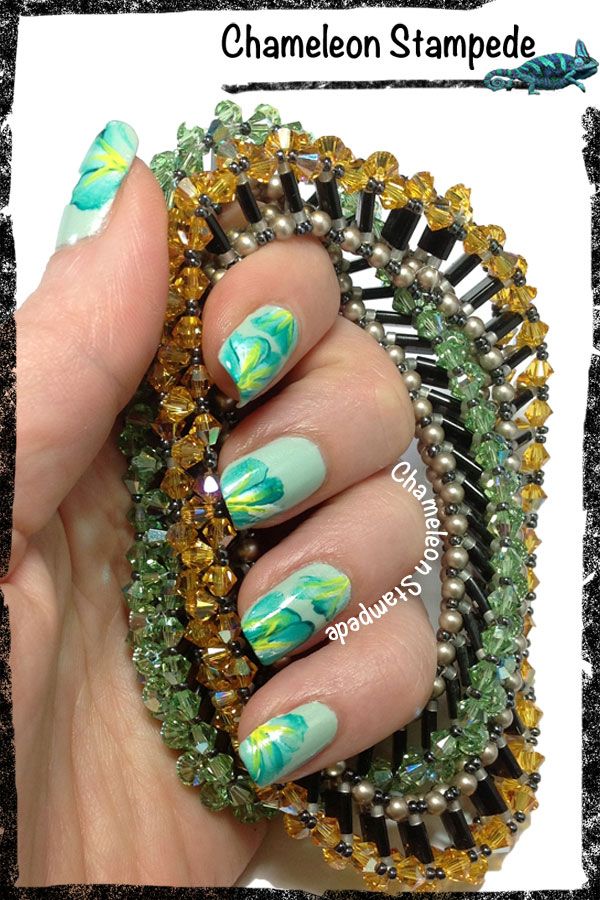
I'm so excited to do a guest post today for the amazing Pam!  My name is Mandy and I have a blog called Chameleon Stampede www.ChameleonStampede.blogspot.com  I wanted to do something special, so I decided to give one stroke flowers another try.  One stroke mani's always look special to me.  I also turned to my jewelry for color inspiration.


chameleon stampede


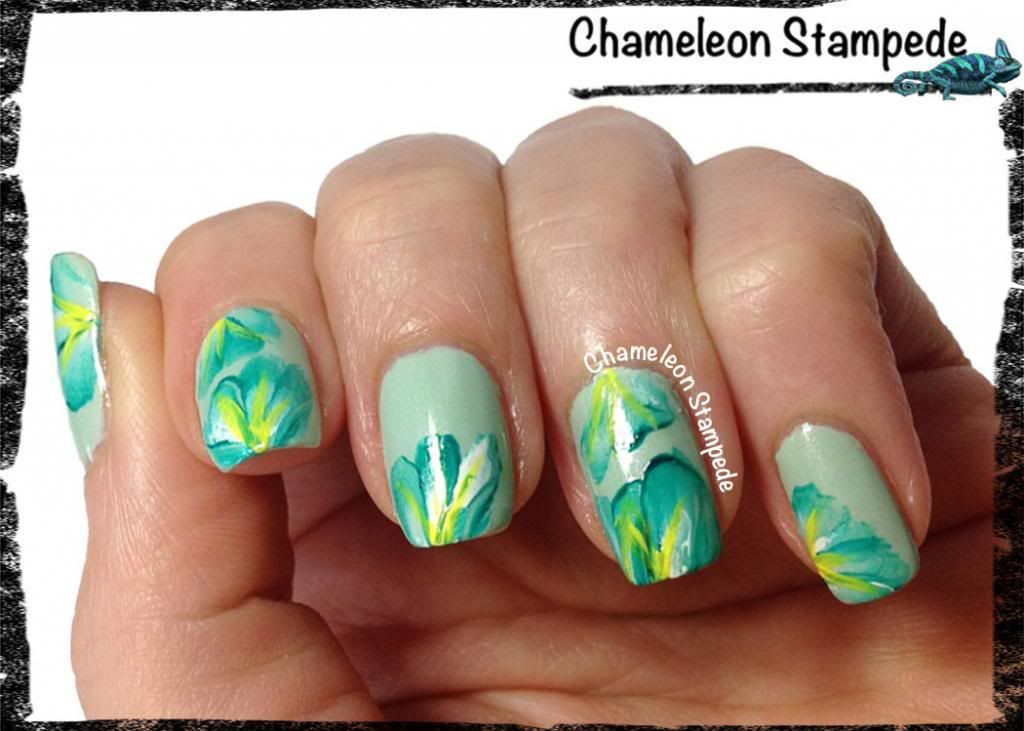
The base of this mani is 2 coats of China Glaze Keep Calm, Paint On.  It's one of those perfect spring/summer mint colors with some added shimmer and it's got the best name! 


chameleon stampede

I really like tone on tone designs because they are subtle and bold somehow at the same time.  I made these green petals that don't really resemble any particular flower, but they're still fun.  I added some yellow to make them stand out and add depth.


chameleon stampede


I love how my thumb turned out!  It looks the best… maybe because it was the last nail I did and I had a bit of practice at that point.


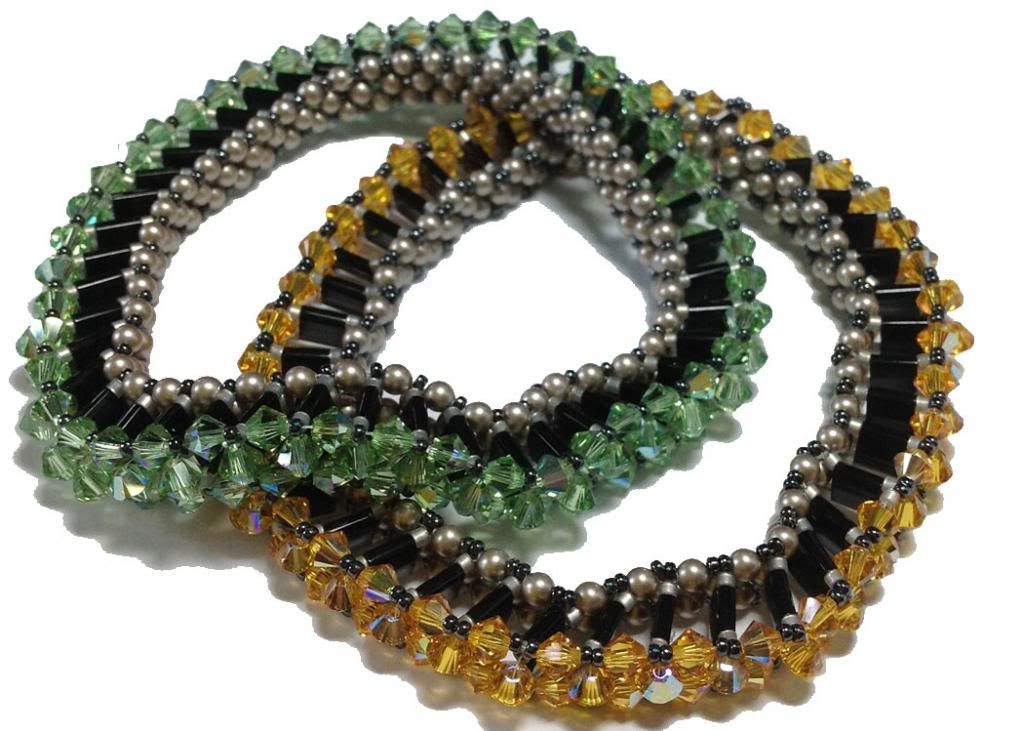
Here's a quick pick of my bracelets in case you want to see them.  This pattern was a pain in the butt, but they turned out ok.  I always notice the mistakes, but I think we all have a bad habit of doing that with our own work.

I hope you like my mani and that you'll join me soon in the CHAMELEON STAMPEDE!
Thanks again for having me Pam!

Thanks and love!
-Mandy

Best Blogger Tips
  • Share On Facebook
  • Digg This Post
  • Stumble This Post
  • Tweet This Post
  • Save Tis Post To Delicious
  • Float This Post
  • Share On Reddit
  • Bookmark On Technorati
Blog Gadgets

Thursday, August 22, 2013

Guest Post Series, with Captivating Claws - Camo Watermarble

Today I am excited to be able to once again share with you, a post by a guest blogger that I have known from the beginning. Jodi from Captivating Claws ordered some polishes from the first Girly Bits launch (which by the way has an anniversary coming up!!) Her order was number 22 from the Sea's the Day Collection, so I thought it was fitting that this posted on the 22nd. Jodi's order was for  Denim Diva, Razzle Dazzle and  Stormy Skies (original version)
Jodi has become well known for her watermarbles, and I recall THIS ONE from about a year ago or so that made me a forever fan of them.
Thank you Jodi, for gracing our page with your beautiful creations.
♥Pam♥


Hey Everyone..  I'm Jodi from Captivating Claws..  I was so excited when Pam asked me to create a guest post for her blog.  I've "known" Pam for a while now.. We met in a polish group on Facebook and it's been really great watching her huge success with Girly Bits!!

I've had a crazy summer and haven't had much time for nail art, but for this post, I decided on a water marble.  I used to do them about once a week, but I just haven't had the time lately.  For this "Camo Marble" I used three new Zoyas from The Cashmeres Collection for Fall.. Flynn, Hunter, and Louise..
guest post for Girly Bits

Girly Bits guest post

guest post for girly bits

guest post for Girly Bits


I started with a base coat of Flynn (nude) and marbled with Flynn, Hunter (green) and Louise (dark brown).  Zoyas cremes are always a bit thick, so this marble wasn't that easy for me.  The colors didn't spread easily in the water and I had a problem with water bubbles, but ultimately, I really like this marble.  I topped it off with China Glaze Fast Forward topcoat.

Thanks to Pam for inviting me to be a part of all the guest posts she's been hosting lately.. It was fun!! :)
Best Blogger Tips
  • Share On Facebook
  • Digg This Post
  • Stumble This Post
  • Tweet This Post
  • Save Tis Post To Delicious
  • Float This Post
  • Share On Reddit
  • Bookmark On Technorati
Blog Gadgets

Tuesday, August 20, 2013

Guest Post Series, with Polish Obsession. Featuring Razzle Dazzle and Nail Art

Hiya!! I am so happy to have Marisa from POLISH OBSESSION on the blog today. I have followed her blog for a long time, and she is a long time customer of Girly Bits, so it's perfect that she is here today to share her creations with all of you. Marisa always has a wide variety of colours and textures on her blog, and had quite an assortment of Indies, so she is a good reference point if you are looking. She is also quite active on TWITTER, so be sure and check her out!

Thank you Marisa, for sharing with us today, and especially for choosing things close to my heart.

♥Pam♥


Hi fellow nail polish lovers!!

My name is Marisa and I'm the writer of Polish Obsession.  I'm so happy to have the opportunity to do a guest post for Pam.  I'm a huge fan of her polishes and I've been a blog follower for a long time, so I'm truly honored.

For this post, I wanted to do something really fun, so I grabbed Razzle Dazzle, one of my favorite Girly Bits polishes.  Here's what I came up with.

Razzle Dazzle, Nail art, Fan brush
Artificial Light
Index finger: Sally Hansen Fuchsia Power with polka dots using Nicole by OPI I'm a Belieber and Girly Bits Razzle Dazzle
Middle: Orly Au Champagne as a base with I'm A Belieber and Fuchsia Power using a fan brush
Ring: Tape mani (using striping tape) with Razzle Dazzle and I'm a Belieber
Pinky: Three coats of Razzle Dazzle on its own.

nail art, fan technique
Artificial Light

Artificial Light

Artificial Light

Natural Light
I'm a huge lover of pink and purple together, so I really like how this mani turned out.  I decided to do the fan brush technique on my middle finger because it's something Pam really liked when I did a previous mani using the technique.

Thanks for reading!  I hope you guys liked seeing this mani.  Thanks for having me Pam!


Best Blogger Tips
  • Share On Facebook
  • Digg This Post
  • Stumble This Post
  • Tweet This Post
  • Save Tis Post To Delicious
  • Float This Post
  • Share On Reddit
  • Bookmark On Technorati
Blog Gadgets

Saturday, August 17, 2013

Guest Post Series, with Refined and Polished featuring Razzle Dazzle

Today's guest blogger is Lakeisha, from Refined and Polished. She and I met a few years ago, in a nail polish group when Girly Bits was in it's infancy. It's so awesome to see that she still has love for the original release of Razzle Dazzle, shown here in the original bottle with the paper label, and two colour logo. It's even a mini! Oh how things have changed.
Lakeisha typically pairs her manicures with fashion inspiration boards, which is a great way of viewing the seasons colour trends. Be sure and check out her blog, for many different colour pairings and fashion styles to suit any taste!

Thank you so much for sharing with us today!
♥Pam♥


Hey dolls! I’m Lakeisha from Refined and Polished and it is my absolute pleasure to be a part of Pam’s guest blogger series! We met several years ago in a nail polish facebook group and it has been great to watch Girly Bits grow into such an amazing brand. Of course for this guest post, I had to start with one of Pam’s polishes. When Pam previewed the first Girly Bits collection in our group, Razzle Dazzle was the one that caught my eye the most. It is a raspberry jelly base that is filled with scattered holo particles and fuchsia, blue, and copper glitter. The base of Razzle Dazzle builds up nicely, so three coats were used. I wanted to pull out the blue sparkles in Razzle Dazzle, so I used two coats of Illamasqua Cameo, a gorgeous cornflower blue, on the accent nails. My favorite types of nail art are polka dots and striping tape and I always love an opportunity to pair the two together. Lately, I can’t get enough of doing various sized polka dots on just a portion of the nail.

nail art tape mani


nail art tape mani striping dots

Girly Bits and Illamasqua


I've never used a glitter as the base for a striping tape accent before and I absolutely love the way Razzle Dazzle sparkles under the creme. This look is the epitome of how I like my nail art; simple but chic and relatively effortless. I adore creating fashion boards inspired by the polish I’m wearing as well, since my love for the two go hand in hand. I hope that you all have enjoyed this look. If you would like to see more, please feel free to keep up with me on Refined and Polished, facebook, or instagram. Thanks again Pam for allowing me to share with your fans!
Girly Bits Razzle Dazzle - Fuchsia + Cornflower Blue
Best Blogger Tips
  • Share On Facebook
  • Digg This Post
  • Stumble This Post
  • Tweet This Post
  • Save Tis Post To Delicious
  • Float This Post
  • Share On Reddit
  • Bookmark On Technorati
Blog Gadgets

Monday, August 12, 2013

Guest Post Series, with Luv My Lacquer. Gradient and Stamping.


Are you a nail art or stamping lover? Then I am sure have visited Jess over at LUV MY LACQUER. If not, then you definitely need to check her out. Her posts are always interesting and detailed.

Thank you Jess for providing us with two of my favourite things- gradients and stamping.

Ok, on with the pretty!!

♥Pam♥


Hello Lacquer Luvers! My name is Jessica & I'm absolutely honored to be here with you guys today. I met Mrs. Girly Bits in a polish group on Facebook a few years ago and am so excited she asked me to guest post for her! For those of you who don't know, I'm the nail blogger over at luvmylacquer.blogspot.com and I LOVE nail art. It's sort of my "thing." While I enjoy swatching, I always feel the urge to put something fun, pretty, or wild on my nails. Today I exercised my nail art skills and came up with a mani that incorporates two of my favorite kinds of nail art: stamping and gradients. So let's get to it, shall we?


When I first sat down to do this manicure I had a ridiculous amount of supplies and polishes in front of me. This is pretty much how I get going. Some days I have a plan but for the most part I just wing it. So after a good while of looking at various nail stamping plates, striping tape, dotting tools, my water marble cup, makeup sponges, studs, and a colorful array of color in bottles it came to me!
 
girly bits guest post

 
My manicure began with a base coat and two coats of my base color, Essie Marshmallow. Using my makeup sponge, I created a gradient using Essie Marshmallow, Bottle Service & DJ Play That Song. I added some extra pretty on top of that with the help of a dazzling scattered holographic glitter polish by Orly called Prisma Gloss Silver.
 

girly bits guest post

 
For the stamping part of my manicure I went for my signature stamp. I've used this plate so many times! M72 image plate comes in a set from BornPrettyStore and has a floral image that comes in three sizes. Using my Konad white stamping polish, I alternated the size of the flowers on all of my nails. My look was complete with a shiny coat of HKGirl topcoat.

girly bits guest post


I am so happy with how this turned out! I have been working on my gradients lately and although this one isn't perfect, I think it's a really pretty combination of colors. I would love to know what you all think of my manicure and what your favorite type of nail art is! If you are interested in seeing more of my work feel free to come over and visit me at luvmylacquer.blogspot.com or find me on Instagram (@luvmylacquer). I hope you all enjoyed this post and thank you Pam for inviting me to guest post for your site!
 
xo,
Jessica

Best Blogger Tips
  • Share On Facebook
  • Digg This Post
  • Stumble This Post
  • Tweet This Post
  • Save Tis Post To Delicious
  • Float This Post
  • Share On Reddit
  • Bookmark On Technorati
Blog Gadgets

Monday, May 27, 2013

The photo that went viral:: Palm tree nail art, and a colourful drink.

Approximately two years ago on June 30th 2011, I made a blog post showing some nail art that I had done on my daughter, who was taking a vacation with some friends to Dominican Republic, for her grade 12 grad trip. You can view my original blog post HERE
While she was there, she took this photo of her nails, while holding a colourful drink.

girly bits nail art and colorful drink

 She posted it on her Tumblr account, and I added it to my blog post, and it immediately went viral. Neither one of us thought to watermark the pictures, until I started seeing it pop up everywhere from Pinterest, to other blogs, tumblr, Facebook and Instagram.
I have since watermarked it.
For the most part, it never really bothered me. I don't really have anything to gain or lose by getting credit for the nail art. Mackenzie of course would love a photo credit. I mean, it's a great photo!! =) In fact, I think for the most part it's the drink that caught peoples eye, not the nail art.
Over the years I gave received numerous emails from people telling me that out photo was being used with out credit, and it felt like there was really no way to rectify it.
It even showed up on Holly Madison's Favourite IG Photo of the Week  FOUND HERE and of course it linked to an Instagram user who was claiming credit. Not a huge big deal, but the exposure would have been nice.

So, I thought I would take the opportunity to share this again, as we roll into summer and think about pool side drinks, and fun summer nail art.

Below is a copy of the original post, with pics and products used.
And of course credit where credit is due. =)
Photo Credit to Mackenzie Heil You will find her  Instagram profile HERE with links to her tumblr account as well.
Nail art credit to Pam at  Girly Bits Cosmetics ( that's me!)


If you have made it this far, and are interested in finding more about Girly Bits Cosmetics

You can also find us on 

and

Located in or around Essex County?   Select Girly Bits Nail Lacquer can be found at:    

Studio N Floral Design and Division Place Hair Studio


CLICK HERE to sign up for our newsletter


My daughter wanted me to paint some palm trees on her nails for her vacation to DR, so here is my attempt. I wanted to do a gradient that looked sort of like a sunset. So I started with China Glaze Pool Party at the cuticle area, and just applied it like regular polish but not going all the way to the tip of the nail because I am putting yellow there. After that dried I sponged on a neon orange, and finished in the tips with more sponging with China Glaze Happy go Lucky. I did two coats of the yellow for better coverage.
Then I used a nail art striper to do the Palm trees. Kinda cute right?? I didn't wait long enough for the design to dry, so the top coat dragged a little, even though I really floated it.


This is also before cleanup because, she is impatient, and had somewhere to go


It was her request to have the palm trees face the way they do. My natural instinct would have been to do them the other way, but either is cute.


Thanks for looking
Let me know if you have a request for summer nail art that you would like to see, or what your favourite nail is in the summer.
♥pam♥


Best Blogger Tips
  • Share On Facebook
  • Digg This Post
  • Stumble This Post
  • Tweet This Post
  • Save Tis Post To Delicious
  • Float This Post
  • Share On Reddit
  • Bookmark On Technorati
Blog Gadgets

Monday, July 23, 2012

Summer pedicures

 I love doing nail art on my toes in the summer. I feel like the effort I put into nail art on my toes isn't wasted, since it lasts so long. =) Yep, that's the lazy busy person in me talking.

I also like the fact that I can do both feet equally as well. When doing nail art on my hands, my non-dominant hand is great. My dominant hand needs to hide. Or move really fast, so you can't see it.
Getting my feet into a position to be painted and decorated is a sight to behold. I admit, I am fairly flexible, which is a good thing. I also admit I  have lots of 'stuffing' in the way of getting my feet near my hands.

On to the summer piggies--

For this pedicure, I used two coats of OPI Fly for the base. Then I used China Glaze Aquadelic and a large dotting tool to make large and medium dots randomly. If you do not have a large dotting tool, you can use the rounded end of a makeup brush, or open a bobby pin and use the rubber tip, or push a thumb tack into the eraser on the end of a pencil.
Then I used OPI Fiercely Fiona, and placed slightly smaller dots over the large Aquadelic dots, and then filled in the spaces with small dots in Fiercely Fiona and Aquadelic.

Thanks for looking!!

♥Pam♥ Best Blogger Tips
  • Share On Facebook
  • Digg This Post
  • Stumble This Post
  • Tweet This Post
  • Save Tis Post To Delicious
  • Float This Post
  • Share On Reddit
  • Bookmark On Technorati
Blog Gadgets

Wednesday, June 6, 2012

Pink Pedicure Wednesday

What is this!?!? a normal blog post?
*blinking eyes*
Yes! A blog post.
Wow, I miss blogging. A lot.
However, as much as I have requested an extension, there still seems to be only 24 hours in a day. I would even settle for a few extra days in a week. =)

Yesterday, I did a cute pedi on a customer, so I thought I would share. So yes this is cheating a little, but it's still my work, and it fits with the pink Wednesday theme.


For the base coat I used  OPI Shorts Story- which for the record is one of my all time favourite pinks.
You can see my post with it alone, and with Connect the Dots HERE
One of my fave mani's actually.

On top of two coats of Shorts Story, I did a row of dots on each big toe, using Sinful Snow me White, OPI Pink Friday, Zoya Dana, and OPI Ate Berries in the Canaries.

Hope you like it!
Thanks for looking.
♥Pam♥
Best Blogger Tips
  • Share On Facebook
  • Digg This Post
  • Stumble This Post
  • Tweet This Post
  • Save Tis Post To Delicious
  • Float This Post
  • Share On Reddit
  • Bookmark On Technorati
Blog Gadgets

Saturday, September 24, 2011

The evolution of nail art

Happy Saturday Everyone! I will have a VERY exciting announcement after the weekend, but for today I have some nail art for you, with pictures of the stages of how it happened, start to finish.

I started off with a base coat of Revlon Carbonite, (which I got from the lovely Stacy at Parlez-Vous Ongles) which is supposed to be a dupe for Chanel Graphite. I don't have graphite, but from the pics I have seen it's close enough for me.

First thing I did was add random black dots in varying sizes. I used Wet n Wild black creme, which is my favourite black ever!


After the black dots had dried a little bit, I went back over the black dots with Carbonite, making those dots a little smaller than the black dots, leaving a ring of black showing.


Then I went over them each again, using an even smaller dotting tool and Sally Hansen X-treme wear in White On.


And finally I added tiny white dots randomly in between the larger dots, just to accent it and finish the look.


Cute and easy.


Stay tuned for the announcement coming soon.

Thanks for looking!!
♥pam♥
Best Blogger Tips
  • Share On Facebook
  • Digg This Post
  • Stumble This Post
  • Tweet This Post
  • Save Tis Post To Delicious
  • Float This Post
  • Share On Reddit
  • Bookmark On Technorati
Blog Gadgets