Showing posts with label gradient. Show all posts

Monday, August 12, 2013

Guest Post Series, with Luv My Lacquer. Gradient and Stamping.


Are you a nail art or stamping lover? Then I am sure have visited Jess over at LUV MY LACQUER. If not, then you definitely need to check her out. Her posts are always interesting and detailed.

Thank you Jess for providing us with two of my favourite things- gradients and stamping.

Ok, on with the pretty!!

♥Pam♥


Hello Lacquer Luvers! My name is Jessica & I'm absolutely honored to be here with you guys today. I met Mrs. Girly Bits in a polish group on Facebook a few years ago and am so excited she asked me to guest post for her! For those of you who don't know, I'm the nail blogger over at luvmylacquer.blogspot.com and I LOVE nail art. It's sort of my "thing." While I enjoy swatching, I always feel the urge to put something fun, pretty, or wild on my nails. Today I exercised my nail art skills and came up with a mani that incorporates two of my favorite kinds of nail art: stamping and gradients. So let's get to it, shall we?


When I first sat down to do this manicure I had a ridiculous amount of supplies and polishes in front of me. This is pretty much how I get going. Some days I have a plan but for the most part I just wing it. So after a good while of looking at various nail stamping plates, striping tape, dotting tools, my water marble cup, makeup sponges, studs, and a colorful array of color in bottles it came to me!
 
girly bits guest post

 
My manicure began with a base coat and two coats of my base color, Essie Marshmallow. Using my makeup sponge, I created a gradient using Essie Marshmallow, Bottle Service & DJ Play That Song. I added some extra pretty on top of that with the help of a dazzling scattered holographic glitter polish by Orly called Prisma Gloss Silver.
 

girly bits guest post

 
For the stamping part of my manicure I went for my signature stamp. I've used this plate so many times! M72 image plate comes in a set from BornPrettyStore and has a floral image that comes in three sizes. Using my Konad white stamping polish, I alternated the size of the flowers on all of my nails. My look was complete with a shiny coat of HKGirl topcoat.

girly bits guest post


I am so happy with how this turned out! I have been working on my gradients lately and although this one isn't perfect, I think it's a really pretty combination of colors. I would love to know what you all think of my manicure and what your favorite type of nail art is! If you are interested in seeing more of my work feel free to come over and visit me at luvmylacquer.blogspot.com or find me on Instagram (@luvmylacquer). I hope you all enjoyed this post and thank you Pam for inviting me to guest post for your site!
 
xo,
Jessica

Best Blogger Tips
  • Share On Facebook
  • Digg This Post
  • Stumble This Post
  • Tweet This Post
  • Save Tis Post To Delicious
  • Float This Post
  • Share On Reddit
  • Bookmark On Technorati
Blog Gadgets

Thursday, June 30, 2011

Tropical Nail Art - Palm Trees

My daughter wanted me to paint some palm trees on her nails for her vacation to DR, so here is my attempt. I wanted to do a gradient that looked sort of like a sunset. So I started with China Glaze Pool Party at the cuticle area, and just applied it like regular polish but not going all the way to the tip of the nail because I am putting yellow there. After that dried I sponged on a neon orange, and finished in the tips with more sponging with China Glaze Happy go Lucky. I did two coats of the yellow for better coverage.
Then I used a nail art striper to do the Palm trees. Kinda cute right?? I didn't wait long enough for the design to dry, so the top coat dragged a little, even though I really floated it.


This is also before cleanup because, she is impatient, and had somewhere to go


It was her request to have the palm trees face the way they do. My natural instinct would have been to do them the other way, but either is cute.


Thanks for looking
Let me know if you have a request for summer nail art that you would like to see, or what your favourite nail is in the summer.
♥pam♥

**** Here is an edit, post vacation****
My daughter was showing me some of her pics from her vacation and among them was this amazing shot of her nails. So I thought I would add it here.


Best Blogger Tips
  • Share On Facebook
  • Digg This Post
  • Stumble This Post
  • Tweet This Post
  • Save Tis Post To Delicious
  • Float This Post
  • Share On Reddit
  • Bookmark On Technorati
Blog Gadgets

Wednesday, June 8, 2011

Summertime, and the livin' is easy...♪♫♫

Playing with polish is the summertime is always so fun. I love nail art and other fun techniques.
So today I started off with China Glaze Strawberry Fields (at least I am fairly certain that what it is, the sticker fell off).

Then I decided to spruce it up with some sponging. So I added some Sinful Cloud 9, which is a shimmery orange. I just painted some on the edge of a makeup sponge and sponged it lightly on the tips of my nails. I went over some of them twice if it wasn't showing up enough for my liking.


I actually liked it like this, but if you know me, you know I can't leave well enough alone :)
So I added some China Glaze Happy Go Lucky ( bright yellow creme) to the tips, using the same technique, and leaving some of the orange showing.


I think it would look great with blue/green/lime or yellow as well. Maybe tomorrow. If I were to do this again I might choose a shimmery yellow instead of a cream, but it works well like this too.


Thanks for looking! Have a fantabulous day!


Best Blogger Tips
  • Share On Facebook
  • Digg This Post
  • Stumble This Post
  • Tweet This Post
  • Save Tis Post To Delicious
  • Float This Post
  • Share On Reddit
  • Bookmark On Technorati
Blog Gadgets

Monday, June 6, 2011

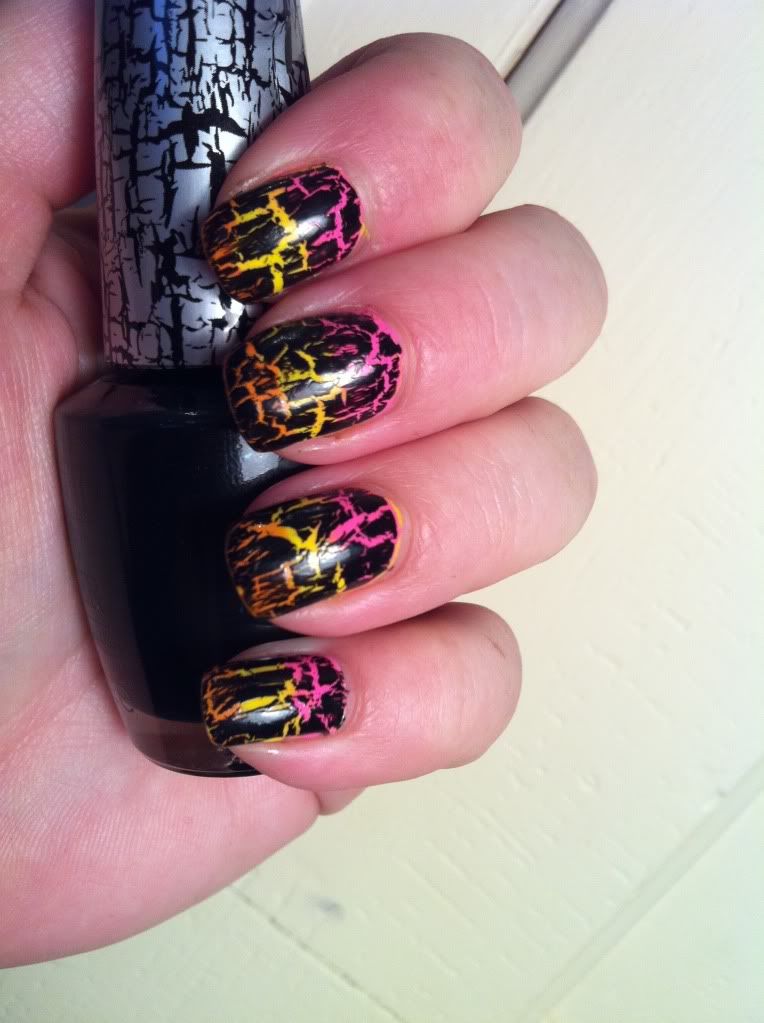
Colourful gradient under shatter

Here is another favourite way of mine to wear black shatter. I get so many compliments when I wear it like this. The 'gradient' isn't really a gradient but rather three lines-but the shatter over top really pulls it together and makes it look like a gradient. It's fun and easy and works with a lot of different colours.


For this one I used a yellow base just to make the colours really pop, then did a line of pink and orange. Then came a coat of Seche Vite just because I didn't want to wait for the polish to dry (it's best if you apply shatter polish over dry nail polish)  before applying OPI Black Shatter. Best Blogger Tips
  • Share On Facebook
  • Digg This Post
  • Stumble This Post
  • Tweet This Post
  • Save Tis Post To Delicious
  • Float This Post
  • Share On Reddit
  • Bookmark On Technorati
Blog Gadgets